DIY Pop-up Rainbow Card
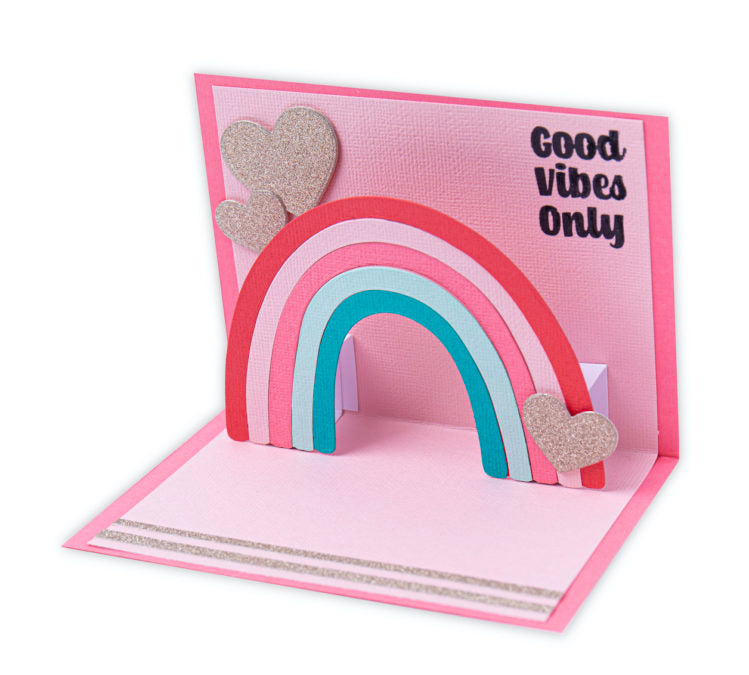
To celebrate our 20th Birthday here at Sizzix, I wanted to share with you a fun, interactive, DIY card that would be perfect for any upcoming celebration; Pop-up Rainbow Card!
You will need...
- Sizzix Big Shot Machine (660200) or Sizzix Big Shot Express Machine (660850) or Sizzix Big Shot Foldaway Machine (662220)
- Sizzix Bigz Die - Rainbow (665197)
- Sizzix Thinlits Die Set 16PK - Basic Shapes (665185)
- Sizzix Clear Stamps 9PK - Everyday Sentiments (665199)
- Sizzix Surfacez - Cardstock, 8 1/4" x 11 3/4", 20 Assorted Colors, 80 Sheets (663007)
- Sizzix Surfacez - The Opulent Cardstock Pack, Rose Gold, 50PK (664534)
- Sizzix Making Essential - Express Glue 120ml (664576)
- Sizzix Making Essential - Foam Tape (663709)
- Sizzix Making Essential - Permanent Adhesive Roller (663474)
- Sizzix Making tool - Scissors, small (664818)
- Cardstock (white)
- Ink (Black)
- Paper Trimmer
- Ruler
- Stamping Block
- Trim a piece of folded Sizzix Primrose Cardstock to 4.13" x 5.5" (10.5cm x 14 cm) and a folded piece of Ballet Slipper Cardstock slightly smaller at 5" x 4.9" (10 cm x 12.5cm).

2. Layer the Ballet Slipper card inside the Primrose Card and adhere using a Sizzix Adhesive Roller.


3. Die cut the Rainbow Die 5 times from Hibiscus, Cherry Blossom, Primrose, Mint Julep and Mermaid Kiss Sizzix Cardstock.

4. Use the Hibiscus rainbow as a base and trim each arch of the rainbow from a different color, adhering them with glue to the hibiscus rainbow. Make sure to leave the top arch as the Hibiscus color and work your way down until the smallest arch is Mermaid Kiss.

5. Trim four pieces of white cardstock to 2.7" x 0.9" (7.5cm x 2.5cm) and fold them twice to create a 3-sided square.

6. Slot two of the folded pieces of cardstock together and adhere, using Sizzix Express Glue, to create a square. Do this with each folded strip so you have two squares.

7. Using glue adhere one side of the squares to the back the rainbow at the bottom on either side of the arch.

8. Apply glue to two other sides of the square (bottom and side) and press them into the fold the card so that the fold of the square slots into the fold of the pink layered card.

9. Die Cut three hearts from Rose Gold Glitter Cardstock using the basic shapes Die Set and adhere onto the card where you see fit using Sizzix Foam Tape.

10. Trim two pieces of rose gold glitter cardstock to roughly 12cm x 0.5cm and adhere them along the bottom of the cherry blossom card using glue.

11. Stamp the sentiment of your choice in the top corner using black ink to finish it off.


Voila! Your Sizzix DIY Pop-up Rainbow Card is complete - a stunning, colourful masterpiece!
Thank you for reading our Sizzix Blog and following how to craft your own DIY blog Pop-up Rainbow Card. We love to see your creations! Share your makes with us using the hashtag #mymakingstory!
Crafted by Sizzix Designer Alexis Trimble
-
Posted in
Cardmaking, Tutorials and Inspiration


