
Tim Holtz Scribbly Snowflakes
The festive season is on it's way and Tim Holtz's Scribbly Snowflakes have settled! What better way to get into the spirit then heading to your craft area and starting to make Christmas cards with some festive music in the background? Today I have created a Sizzix Scribbly Snowflakes Blog for you to enjoy and get inspired by for your festive makes!
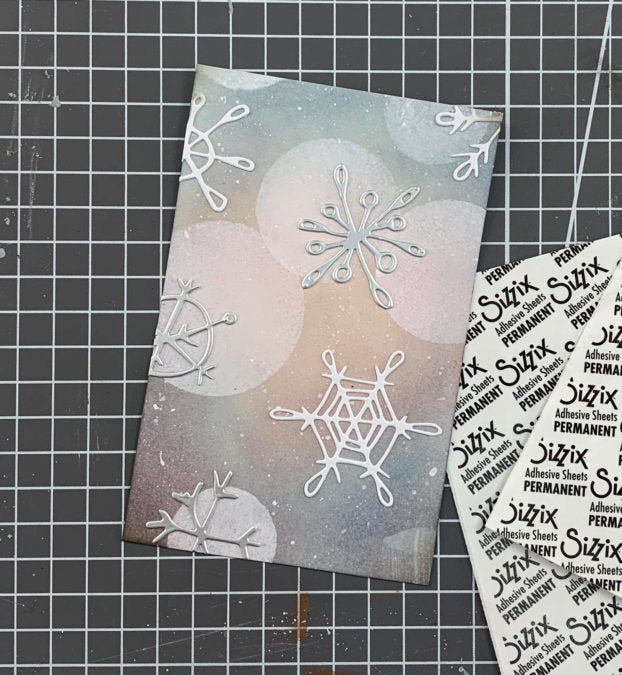
Here's a lovely idea to create a bokeh effect using the Tim Holtz Ranger Inks and the new Sizzix Scribbly Snowflakes Die Set from Tim Holtz's fantastic new winter collection.
You will need:
- Sizzix® Thinlits® Die Set - Scribbly Snowflakes by Tim Holtz® (665582)
- Sizzix® Framelits® Die Set - Circles (657551)
- Sizzix® Effectz - Creamy Matte Acrylic Paint, White, 60ml
- Sizzix® Surfacez -The Opulent Cardstock Pack, Silver, 50PK
- Sizzix® Making Essential - Stencil Film, 8 1/4" x 11 5/8", 10 Sheets
- Sizzix® Accessory - Multi-Tool Starter Kit
- Sizzix® Multi-Tool Accessory - Blending Tool Head w/Replacement Sponge
- Sizzix® Making Essential - Foam Tape
- Sizzix® Making Essential - Adhesive Sheets, 6" x 6", Permanent, 10 Sheets
- Ranger Victorian Velvet Distress Pad - Tim Holtz®
- Ranger Weathered Wood Distress Pad - Tim Holtz®
- Ranger Weathered Wood Distress Pad - Stormy Sky
- Artist's Sponge
- Ivory Cardstock
- White Card Stock
- Access to Printer

Step 1.
Choose two or three colors of Ranger Distress Inks to blend together. I chose Stormy Sky, Victorian Velvet and a touch of iced spruce around the edges to give a distressed feel. Next blend the colors together using the Sizzix Multi-tool. Don't worry too much about creating a perfect blend at this point.

Step 2.
Using the three smallest Dies from your Sizzix Circle Framelits Set, cut three circles of varying sizes, from the stencil film. Ensure these are far enough apart that each can be easily stencilled through without stencilling through another circle.

Step 3.
Take some Sizzix White Creamy Acrylic Paint and apply it to a craft mat or a scrap piece of cardstock. Take your artist's sponge and spray once with water so that it is barely damp. Apply the sponge directly to the paint and dab until there is an even covering over an area of the sponge to stamp with.
Take your blended card and lay it on a craft mat. Through the various sized apertures of die cut circles, stamp the white acrylic paint to create opaque white circles over the blended area. I like to make some circles overlap for effect.
Tip: Try not to get carried away with covering the area. Up to 5 well placed circles is enough.

Step 5.
Now, spray the left over paint on the craft mat with water and mix using a palette knife until you achieve an almost milky consistency. Dip your palette knife into the mixture and then flick then pointed end over your inked element to create a splatter effect. This will give the effect of snow in the distance.

Step 6.
Apply the Sizzix Adhesive Sheets to the White Cardstock and the Matte Silver Cardstock from the Opulent Cardstock Pack. Trim the card down so that the adhesive sheets take up all of one side. From these card rectangles, die cut lots of the snowflake elements from the Thinlits Scribbly Snowflakes Die Set by Tim Holtz.
Remove the protective layer from the adhesive sheets on the back of the die cut pieces and adhere them to the blended element from step 1. Some snowflakes should be white and some should be silver.

Step 7.
Finally, stamp or print you chosen sentiment on a sheet of white cardstock. I chose to cut around it in an off-rectangle shape and adhere it using foam tape for added dimension. Then, also using Sizzix Foam Tape, adhere the blended base to a white card base.

Have a lovely Festive Season :)
Thank you for reading this blog, I hope you enjoyed it! Remember to tag us in your makes using the hashtag #mymakingstory we love to see your creations!
Crafted by Sizzix designer Joshua Griffiths
-
Posted in
Cardmaking, Tutorials and Inspiration